The Honeywell T6 Thermostat is a cutting-edge, Wi-Fi enabled smart thermostat designed for optimal heating and cooling control. It features a sleek touch screen, geofencing, and smart sensors to enhance energy efficiency and comfort. With its innovative scheduling capabilities and compatibility with smart home systems, the T6 model offers a user-friendly experience and seamless integration into modern lifestyles.
1.1 Overview of the Honeywell T6 Series
The Honeywell T6 Series is a line of advanced smart thermostats designed to optimize home comfort and energy efficiency. Equipped with a high-resolution touch screen and intuitive interface, these thermostats offer precise temperature control and seamless integration with smart home systems. The series includes models with geofencing technology, smart sensors, and voice control compatibility, ensuring a tailored heating and cooling experience. Its energy-saving features and adaptive learning capabilities make it a popular choice for modern households seeking convenience, efficiency, and reliability in temperature management.

1.2 Key Features of the T6 Thermostat
The Honeywell T6 Thermostat boasts an array of innovative features, including geofencing technology, which adjusts settings based on your location. Its smart sensors optimize temperature control by monitoring conditions across your home. The thermostat also offers voice control integration, allowing for hands-free adjustments. Energy reports provide insights into usage, helping you save on utility bills. Additionally, the T6 supports scheduling and remote access through the Honeywell Home app, ensuring you can manage your comfort settings from anywhere. These features collectively enhance efficiency, convenience, and overall home comfort.
1.3 Benefits of Upgrading to the T6 Model
Upgrading to the Honeywell T6 Thermostat offers enhanced energy efficiency, reducing utility bills through smart temperature management. Its advanced scheduling and geofencing features ensure optimal comfort while minimizing waste. The T6 also integrates seamlessly with smart home systems, providing a unified control experience. With remote access and energy usage reports, users gain greater insights into their consumption patterns. Additionally, the T6 supports voice control, making adjustments effortless. These benefits combine to create a smarter, more convenient, and energy-conscious home environment, making the T6 a valuable upgrade for modern households seeking comfort and sustainability.

Pre-Installation Requirements
Before installing the Honeywell T6 Thermostat, ensure system compatibility, gather necessary tools, and shut off power to the HVAC system for safety. Verify wiring layout and labels to avoid errors during installation. Ensure the thermostat location provides optimal temperature sensing and accessibility. Familiarize yourself with local electrical codes and manufacturer guidelines to ensure a smooth setup process.
2.1 System Compatibility Check
Before installing the Honeywell T6 Thermostat, ensure it is compatible with your HVAC system. Verify if your system is compatible with the T6’s features, such as geofencing and smart sensors. Check the wiring configuration to confirm it matches the thermostat’s requirements. Refer to the installation manual for specific compatibility details. Ensure your HVAC system supports the T6’s voltage and control capabilities. Compatibility with smart home systems like Amazon Alexa or Google Home should also be confirmed if integration is desired. Proper compatibility ensures seamless operation and optimal performance of the thermostat. Always refer to Honeywell’s official compatibility list for accuracy.
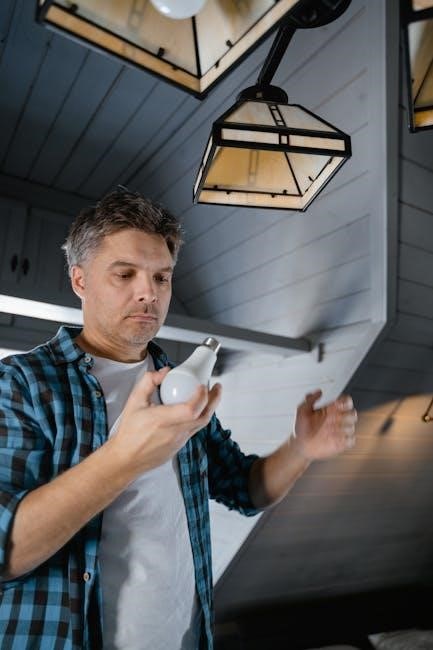
2.2 Tools and Materials Needed
To install the Honeywell T6 Thermostat, gather the necessary tools and materials. You will need a screwdriver (both Phillips and flathead), a wire stripper, and a voltage tester to ensure safe electrical work. A ladder may be required for accessing the thermostat location. Additional materials include mounting screws, wall anchors, and possibly new wires if your system requires upgrades. Ensure you have the thermostat unit, its base plate, and any provided adapters. For optional features like geofencing, a smartphone and internet connection are needed. Refer to the manual for any specific requirements based on your HVAC system type.
2.3 Safety Precautions
Before installing the Honeywell T6 Thermostat, ensure all safety precautions are followed. Turn off the power to your HVAC system at the circuit breaker to avoid electrical shocks or injuries. Verify the system is completely cool or off before starting work. Handle wires carefully to prevent damage or short circuits. Wear protective gear, such as gloves, if necessary. Ensure the thermostat is installed correctly to maintain system efficiency and safety. If unsure about any step, consult a licensed professional. Always adhere to local electrical codes and regulations to ensure a safe and compliant installation.

Step-by-Step Installation Process
Follow a structured approach: prepare the site, remove the old thermostat, mount the T6, connect wires, and power on the device for a smooth setup.
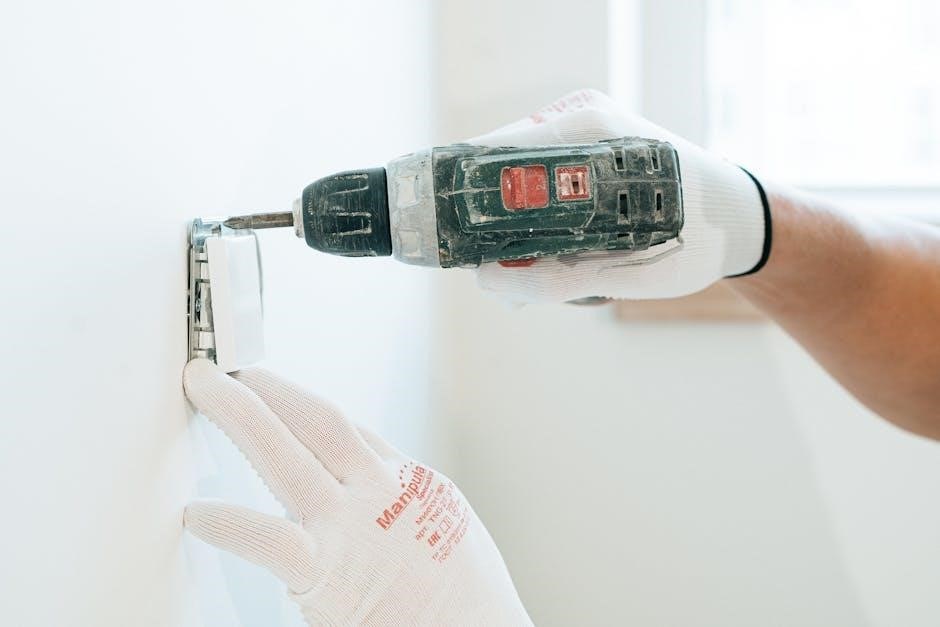
3.1 Preparing the Site
Before installation, ensure the area is clear and safe. Turn off power to the HVAC system at the circuit breaker. Gather all tools and materials, including the T6 thermostat, mounting hardware, and wires. Clean the wall surface where the thermostat will be mounted to ensure proper adhesion. Remove any old thermostats or debris. Verify system compatibility and label wires if necessary. This preparation ensures a smooth and efficient installation process, avoiding potential issues later. Proper site readiness is essential for a successful setup of the Honeywell T6 thermostat.
3.2 Removing the Old Thermostat
Start by switching off the power to the HVAC system at the circuit breaker to ensure safety. Carefully remove the screws holding the old thermostat in place, then gently pull it away from the wall. Disconnect the wires one by one, labeling them as you go to ensure correct wiring for the new thermostat. Remove any additional components like batteries or jumpers. Clean the area to prepare for the new installation. Proper removal prevents damage and ensures a smooth transition to the Honeywell T6 thermostat. Take your time to avoid errors during this critical step.
3.3 Mounting the T6 Thermostat
Ensure the wall is level and clean before mounting the T6 thermostat. Use the provided screws to secure the mounting plate to the wall, aligning it with the wiring configuration. Gently attach the thermostat to the plate, ensuring it clicks securely into place. Check for stability and proper alignment. If necessary, adjust the plate for a flush fit. Once mounted, verify that the thermostat is evenly positioned and ready for wiring. This step ensures a professional installation and proper functionality of the Honeywell T6 thermostat. Take care to handle the device gently to avoid damage.
3.4 Connecting the Wires
Refer to the wiring diagram in the Honeywell T6 installation manual to identify the correct terminals for your system. Turn off the power supply at the circuit breaker before connecting any wires. Match the wires from your HVAC system to the corresponding terminals on the T6 thermostat, ensuring proper labeling (e.g., R, W, Y, G, C). Securely connect each wire to the correct terminal, avoiding any forced connections. Double-check the wiring configuration to prevent errors. Once all wires are connected, verify that the thermostat is properly linked to your HVAC system for optimal functionality and safety.
3.5 Powering On the Thermostat
Once all wires are securely connected, restore power to your HVAC system at the circuit breaker; The Honeywell T6 thermostat will automatically power on, and the display will light up. Allow the device to complete its self-test, which ensures all components are functioning correctly. After the self-test, the thermostat will display the initial setup screen. Verify that the device is powered on and functioning properly before proceeding to configuration. If the thermostat does not power on, check the wiring connections and ensure the power source is correctly restored.
Wiring and Connections
Proper wiring is essential for the Honeywell T6 Thermostat to function correctly. Use the provided wiring guide to ensure all connections are secure and compatible with your HVAC system.
4.1 Understanding the Wiring Diagram
The wiring diagram for the Honeywell T6 Thermostat is a detailed visual guide that illustrates the connections required for proper installation. It shows the placement of wires, including power, heating, cooling, and auxiliary connections. Each wire is color-coded or labeled to ensure accurate installation. The diagram also highlights compatibility with various HVAC systems, such as heat pumps, gas furnaces, and dual-fuel systems. By referencing the wiring diagram, you can identify the correct terminals for your specific setup, ensuring safe and efficient operation. Always match the wires to the corresponding terminals as shown in the diagram to avoid electrical issues.
4.2 Connecting to HVAC Systems
Connecting the Honeywell T6 Thermostat to your HVAC system requires careful identification of compatible components. The T6 supports various systems, including heat pumps, gas furnaces, and dual-fuel setups. Begin by ensuring the system is powered off for safety. Match the wires from your HVAC system to the appropriate terminals on the T6, referring to the wiring diagram for guidance. Securely connect the wires to their designated ports, ensuring no loose connections. Once connected, power on the system and test functionality to confirm proper operation. If unsure, consult the user manual or a licensed technician for assistance.
4.3 Integrating with Smart Home Systems
The Honeywell T6 Thermostat seamlessly integrates with popular smart home systems like Amazon Alexa and Google Assistant, enabling voice control and enhanced automation. To integrate, simply link your T6 thermostat to your smart home platform through the Honeywell Home app or the respective smart system’s portal. This integration allows for advanced automation, such as adjusting temperatures based on your daily routines or syncing with other smart devices. Additionally, the T6 can be incorporated into custom scenes and routines, offering a comprehensive smart home experience. Ensure compatibility by checking supported systems in the Honeywell T6 install manual.

Configuration and Setup
The Honeywell T6 Thermostat’s configuration and setup process is straightforward, utilizing the Honeywell Home app for initial setup, scheduling, and preference customization. The manual provides comprehensive guidance for a smooth experience.
5.1 Initial Setup and Programming
The Honeywell T6 Thermostat’s initial setup begins with connecting to your home’s Wi-Fi network using the Honeywell Home app. Follow the app’s step-by-step guide to complete the pairing process. Once connected, program your preferred temperature schedules, ensuring energy efficiency and comfort. The thermostat also allows for geofencing setup, automatically adjusting temperatures based on your location. For smart home integration, link your T6 to platforms like Amazon Alexa or Google Assistant. Refer to the manual for troubleshooting common setup issues, such as connectivity problems or system compatibility checks, to ensure a seamless installation experience.
5.2 Setting Up Wi-Fi Connectivity
Connecting your Honeywell T6 Thermostat to Wi-Fi is essential for smart features. Open the Honeywell Home app, select your thermostat, and choose your home’s Wi-Fi network. Enter the password when prompted. If your network doesn’t appear, restart your router or use a mobile hotspot. The thermostat’s LED will turn green once connected. If connection fails, ensure your network name and password are correct. For troubleshooting, refer to the app’s guidance or reset the thermostat by holding the touch screen for 10 seconds. A successful connection enables remote access, scheduling, and smart home integration.
5.3 Configuring Schedules and Preferences
Configuring schedules and preferences on the Honeywell T6 Thermostat allows for personalized comfort and energy efficiency. Use the Honeywell Home app to set temperature ranges, create daily schedules, and customize settings like geofencing. Enable smart features to automatically adjust temperatures based on your location. You can also set preferences for humidity control, fan operation, and energy-saving modes. The thermostat learns your habits over time, optimizing performance. Adjust these settings anytime through the app or the thermostat’s touch screen to ensure your home remains comfortable while minimizing energy usage.
5.4 Geofencing and Smart Features
The Honeywell T6 Thermostat offers advanced geofencing and smart features to enhance convenience and energy savings. Geofencing uses your smartphone’s location to automatically adjust temperatures when you leave or arrive home. Enable this feature through the Honeywell Home app by setting your home and away locations. Smart features include adaptive learning, which adjusts settings based on your schedule and preferences. The thermostat also provides energy usage reports and integrates with smart home systems for seamless control. These features work together to optimize comfort, reduce energy waste, and simplify home climate management through intuitive and intelligent automation.

Advanced Features and Customization
The Honeywell T6 Thermostat offers energy-saving modes, remote access, and smart sensors for enhanced efficiency. Customize the display, schedules, and preferences to optimize comfort and energy usage.
6.1 Energy-Saving Modes
The Honeywell T6 Thermostat features advanced energy-saving modes designed to optimize your HVAC system’s efficiency. The Eco mode adjusts heating and cooling settings to conserve energy while maintaining comfort. Smart recovery learns your schedule to pre-heat or cool, reducing unnecessary usage; Geofencing technology adjusts temperatures based on your location, ensuring energy isn’t wasted when you’re away. Additionally, the T6 offers customizable energy reports to track usage and identify savings opportunities. These modes work seamlessly with smart sensors to create a balanced, efficient home environment, helping you save energy without compromising on comfort.
6.2 Remote Access and Control
The Honeywell T6 Thermostat offers seamless remote access and control through the Honeywell Home app. Users can adjust temperatures, monitor energy usage, and schedule settings from smartphones or tablets. Geofencing technology automatically detects your presence and absence, optimizing heating and cooling for energy savings. Remote control ensures comfort is maintained even when you’re not at home. The app also provides alerts for system updates and maintenance reminders, keeping your HVAC system running efficiently. This feature enhances convenience and energy efficiency, allowing you to manage your home’s climate effortlessly from anywhere.
6.3 Smart Sensors and Accessories
The Honeywell T6 Thermostat supports smart sensors and accessories to enhance its functionality. Smart room sensors detect temperature in multiple zones, ensuring even heating and cooling. Accessories like smart valves and motion sensors integrate seamlessly, offering advanced control. These devices work together to optimize energy use and comfort. The system allows customization, enabling users to prioritize specific areas of their home. With compatible accessories, the T6 thermostat adapts to various lifestyles, providing a tailored experience. This integration ensures the thermostat operates efficiently, delivering precise temperature control and improved performance.
6.4 Customizing the Display
The Honeywell T6 Thermostat allows users to customize the display to suit their preferences. Adjust brightness levels to ensure optimal visibility in any lighting conditions. Choose from various screen themes and colors to match your home decor. Additionally, the display can be locked to prevent unintended changes. Customize the home screen to prioritize frequently used features, such as current temperature or scheduling. These personalization options enhance user experience, making the thermostat more intuitive and visually appealing. Customization ensures the device blends seamlessly into your smart home environment while maintaining functionality and convenience.
Troubleshooting Common Issues
Identify and resolve common issues like connectivity problems or temperature inaccuracies using diagnostic tools and error codes. Refer to the manual for detailed troubleshooting steps and reset options.
7.1 Diagnostic Error Codes
The Honeywell T6 Thermostat uses specific error codes to identify issues, such as E1 for temperature mismatches or E2 for sensor problems. These codes guide users to resolve problems efficiently. For instance, E3 may indicate communication errors with smart sensors. Refer to the manual for a comprehensive list of codes and corresponding solutions. Understanding these codes helps in diagnosing and fixing issues without professional assistance, ensuring optimal performance and comfort. Always consult the troubleshooting section for detailed instructions to address each error effectively.
7.2 Resolving Connectivity Problems
Connectivity issues with the Honeywell T6 Thermostat can often be resolved by restarting the device and your router. Ensure your Wi-Fi network is stable and within range. If problems persist, check for firmware updates, as outdated software may cause connection failures. Resetting the thermostat to factory settings can also help, but be aware this will erase custom settings. For persistent issues, consult the user manual or contact Honeywell support for troubleshooting assistance. Regularly updating your router’s firmware and ensuring strong signal strength can prevent future connectivity problems.
7.3 Addressing Temperature Inaccuracies
If the Honeywell T6 Thermostat displays incorrect temperature readings, ensure the sensor is clean and free from obstructions. Check the thermostat’s placement, as direct sunlight or drafts can affect accuracy; Verify that the device is properly mounted and level, as tilting may cause errors. If issues persist, perform a factory reset or recalibrate the sensor through the settings menu. Additionally, ensure the thermostat is updated with the latest firmware, as outdated software may cause temperature inaccuracies. If problems remain unresolved, consult the user manual or contact Honeywell support for further assistance. Regular maintenance can help prevent such issues.
7.4 Restarting and Resetting the Thermostat
Restarting the Honeywell T6 Thermostat can resolve minor software issues. To restart, turn the device off at the circuit breaker or disconnect the power supply for 10-15 seconds, then restore power. For a factory reset, press and hold the “Menu” and “Down” buttons simultaneously for 5-10 seconds until the screen resets. This will restore default settings but may require reconfiguring preferences. If issues persist, perform a reset by removing the faceplate and pressing the small reset button on the back of the thermostat for 3-5 seconds. Always ensure the thermostat is properly powered and configured after resetting. Regular resets can help maintain optimal performance.

Maintenance and Upkeep
Regularly clean the Honeywell T6 Thermostat’s display and sensors to ensure accuracy. Update software periodically for enhanced features and performance. Check and replace batteries as needed, and schedule annual professional servicing to maintain optimal functionality and efficiency.
8.1 Cleaning the Thermostat
Regular cleaning of the Honeywell T6 Thermostat is essential to maintain its functionality and appearance. Use a soft, dry cloth to gently wipe the touchscreen display, removing any smudges or fingerprints. Avoid using harsh chemicals or abrasive materials, as they may damage the screen. For the sensors, turn off the power at the circuit breaker and carefully wipe them with a dry cloth to remove dust or debris. This ensures accurate temperature readings and optimal performance. Cleaning should be done every 1-2 months, depending on usage and environmental conditions.
8.2 Updating Software and Firmware
Regular software and firmware updates ensure the Honeywell T6 Thermostat operates with the latest features and security. The thermostat automatically checks for updates when connected to Wi-Fi. To manually update, navigate to the settings menu, select “About Thermostat,” and choose “Update Software.” Ensure a stable internet connection during the process, as interruptions may disrupt the update. Once updated, the thermostat will restart to apply changes. Always refer to the user manual for detailed instructions or contact Honeywell support for assistance with failed updates. Keeping the software up-to-date is crucial for optimal performance and functionality.
8.3 Checking and Replacing Batteries
The Honeywell T6 Thermostat may require battery replacement to maintain its functionality. Check the battery level via the thermostat’s display or through the app. If the battery icon appears, replace the AA alkaline batteries promptly. Ensure the power is turned off at the circuit breaker before removing the old batteries. Insert new batteries in the correct polarity to avoid damage. After replacement, test the thermostat to confirm proper operation. Regularly checking and replacing batteries ensures uninterrupted performance and prevents system failures. Refer to the user manual for specific instructions on accessing the battery compartment and troubleshooting battery-related issues. Always use high-quality batteries for optimal reliability.
8.4 Annual Maintenance Tips
Performing annual maintenance ensures the Honeywell T6 Thermostat operates efficiently and effectively. Start by cleaning the thermostat’s display and sensors with a soft cloth to remove dust and debris. Check and tighten all wiring connections to prevent signal interference. Update the thermostat’s software and firmware to access the latest features and improvements. Inspect and clean the system’s air vents and filters to ensure proper airflow. Replace the backup battery if necessary and verify its charge level. Calibrate the thermostat for accurate temperature readings and review your scheduling preferences to optimize energy usage. Finally, consider scheduling a professional HVAC inspection to ensure the entire system is functioning optimally.

Compliance and Warranty Information
The Honeywell T6 Thermostat complies with safety and environmental regulations, ensuring reliable performance. It is backed by a limited warranty covering parts and labor for up to two years.
9.1 Regulatory Compliance
The Honeywell T6 Thermostat adheres to all applicable regulatory standards, ensuring safe and efficient operation. It complies with RoHS (Restriction of Hazardous Substances) and FCC (Federal Communications Commission) guidelines for electromagnetic compatibility. Additionally, it meets UL (Underwriters Laboratories) safety standards for heating and cooling devices. The thermostat is also designed to comply with ENERGY STAR® requirements, promoting energy efficiency without compromising performance. By meeting these regulations, the T6 model guarantees reliability while minimizing environmental impact. Compliance with ASHRAE (American Society of Heating, Refrigerating, and Air-Conditioning Engineers) standards further ensures optimal energy usage and system integration.
9.2 Understanding the Warranty
The Honeywell T6 Thermostat is backed by a comprehensive warranty program designed to protect your investment. The standard warranty covers parts and labor for up to two years from the date of purchase, ensuring defect-free performance. This warranty applies to manufacturing defects and faulty materials, providing peace of mind for users. For extended coverage, optional plans are available to accommodate specific needs. Proper registration and adherence to installation guidelines are required to maintain warranty validity. Always retain the purchase receipt as proof of ownership. Visit the Honeywell website or contact customer support for detailed warranty terms and conditions.
9.3 Service and Support Options
Honeywell offers a range of service and support options to ensure optimal performance of the T6 Thermostat. Customers can access online resources, including installation guides and troubleshooting tips, through the Honeywell website. For immediate assistance, 24/7 customer support is available via phone, email, or live chat. Additionally, Honeywell provides extended service plans for added protection and maintenance. Users can also benefit from community forums and FAQs to address common queries. Regular software updates are available to keep the thermostat up-to-date with the latest features and improvements. These support options ensure a seamless and efficient user experience.
The Honeywell T6 Thermostat offers a seamless installation process, advanced smart features, and energy-efficient performance, making it an excellent choice for modern smart homes, ensuring comfort and convenience for users.
10.1 Summary of Key Installation Steps
Installing the Honeywell T6 Thermostat involves several key steps to ensure proper functionality. Begin by preparing the site, turning off power to the HVAC system, and removing the old thermostat. Next, mount the T6 thermostat to the wall, ensuring it is level and securely fastened. Carefully connect the wires according to the wiring diagram, matching each terminal to the correct label. Once wired, restore power and follow the on-screen prompts to complete initial setup, including Wi-Fi connectivity and scheduling preferences. Finally, test the system to confirm everything operates smoothly. Refer to the manual if issues arise during any step.
10.2 Final Tips for Optimal Performance
For optimal performance of your Honeywell T6 Thermostat, ensure regular software updates to access the latest features. Clean the screen and sensors periodically to maintain accuracy. Utilize geofencing and smart sensors to automate temperature adjustments based on your location and home conditions. Set energy-saving schedules that align with your daily routines and preferences. Consider enabling adaptive recovery to pre-cool or pre-heat your home efficiently. Finally, monitor energy usage through the app to identify opportunities for further savings. By following these tips, you can maximize comfort and efficiency while minimizing energy consumption.
10.3 Resources for Further Assistance
For additional support with your Honeywell T6 Thermostat, visit the official Honeywell website for comprehensive guides, manuals, and troubleshooting tips. Contact Honeywell’s customer support team for personalized assistance. Explore online forums and community discussions for shared experiences and solutions. Refer to the Honeywell Home app for in-app tutorials and FAQs. Watch installation and setup videos on Honeywell’s official YouTube channel. For complex issues, consult a licensed HVAC technician. These resources ensure you maximize your thermostat’s potential and resolve any challenges efficiently.